Line & Shape Tools
Written By Philipp Brockerhoff
Last updated 15 minutes ago
The Line Tool and Shape Tool are used to create and edit open or closed node based objects. While both tools share the same editing features, the Shape Tool can create enclosed shapes with optional fills.
Use the Line Tool to create open paths such as walls, roads, rivers, and decorative borders.
Use the Shape Tool to create enclosed areas such as rooms, buildings, dungeon layouts, courtyards, or other areas that can be outlined or filled with a color or texture.
Select either tool by clicking its icon in the toolbar. Press L to select the Line Tool or R for the Shape Tool.
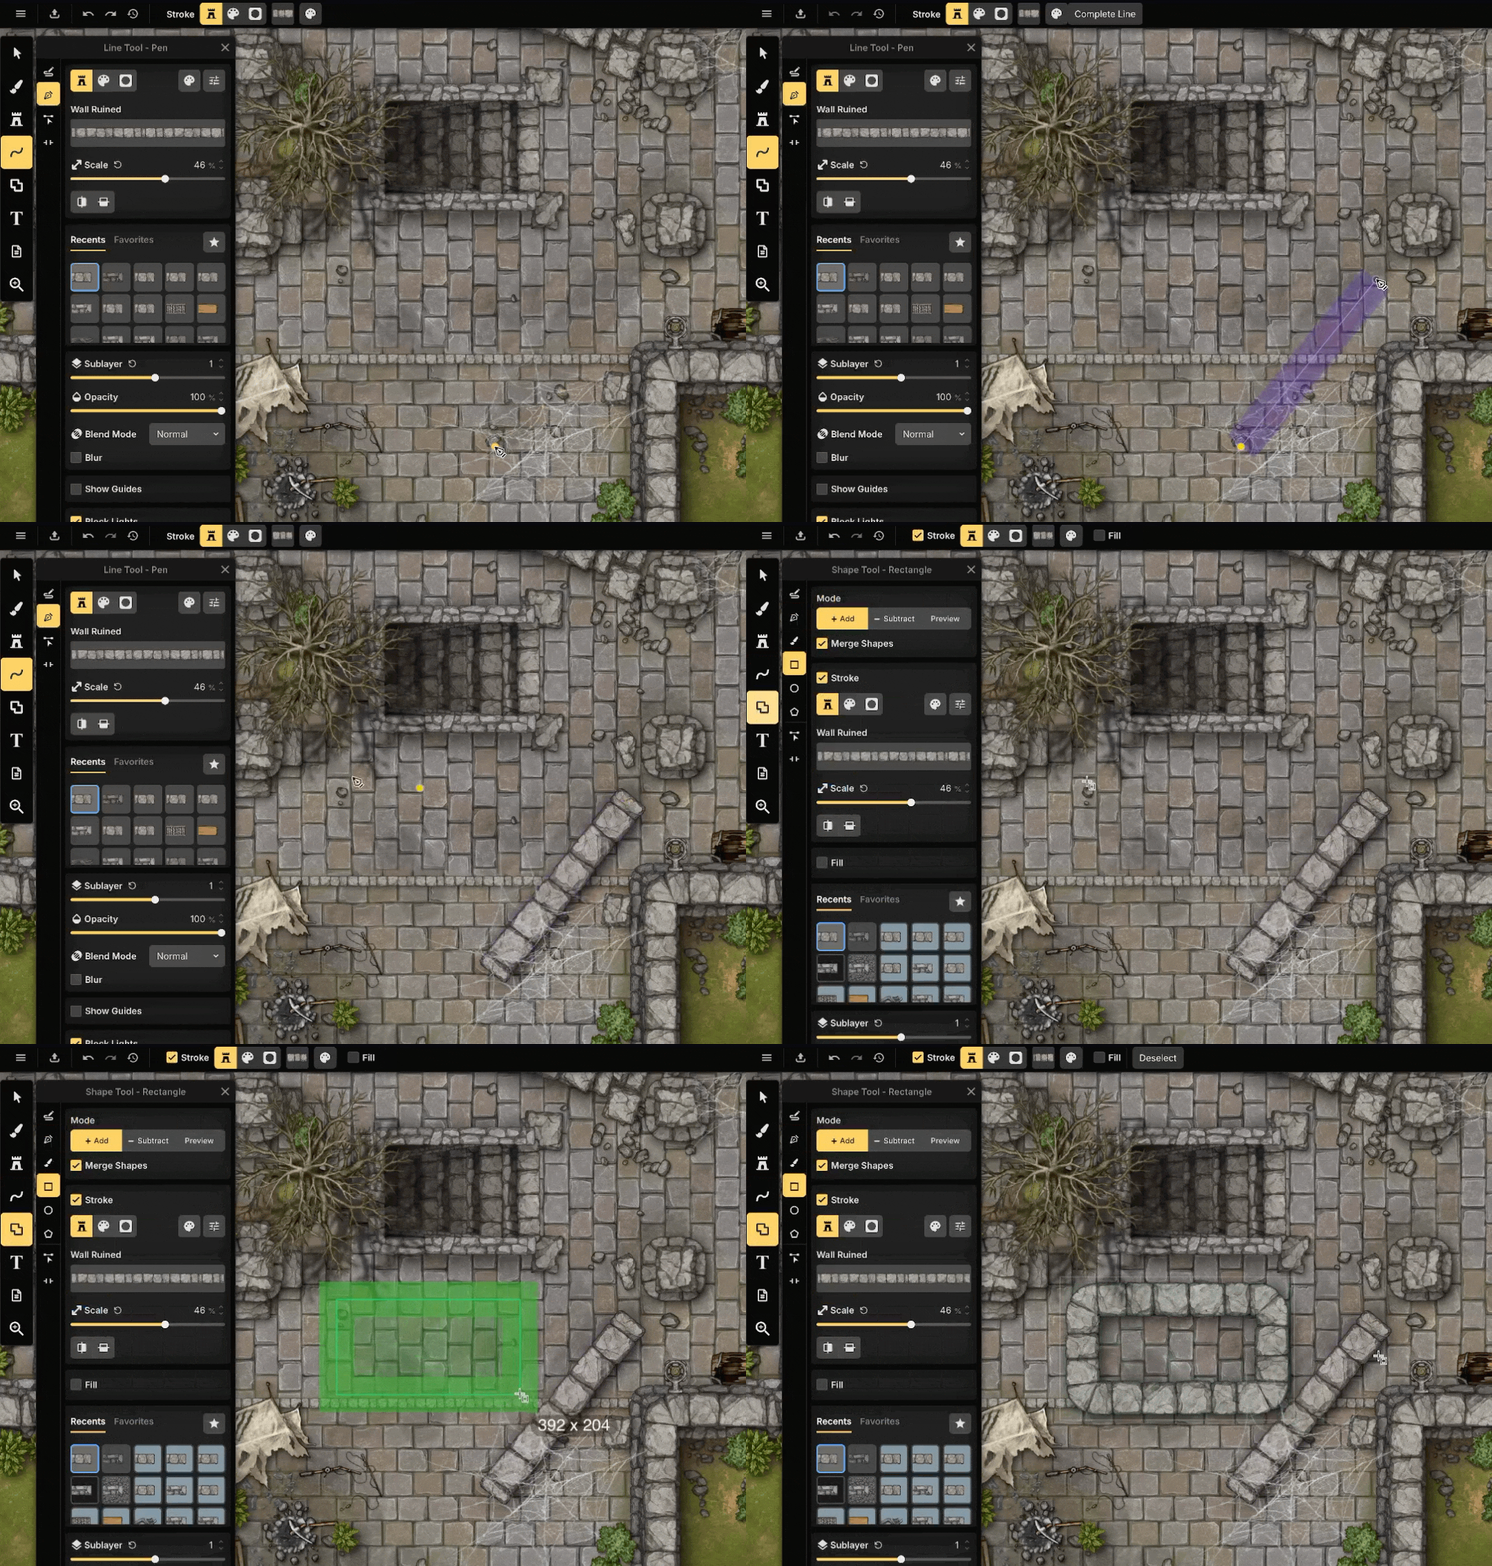
Creating Lines & Shapes
The Line Tool and Shape Tool provide several creation modes for drawing node based objects. Free Draw and Pen are available in both tools. The remaining modes are available only in the Shape Tool and are used to create or modify enclosed shapes.
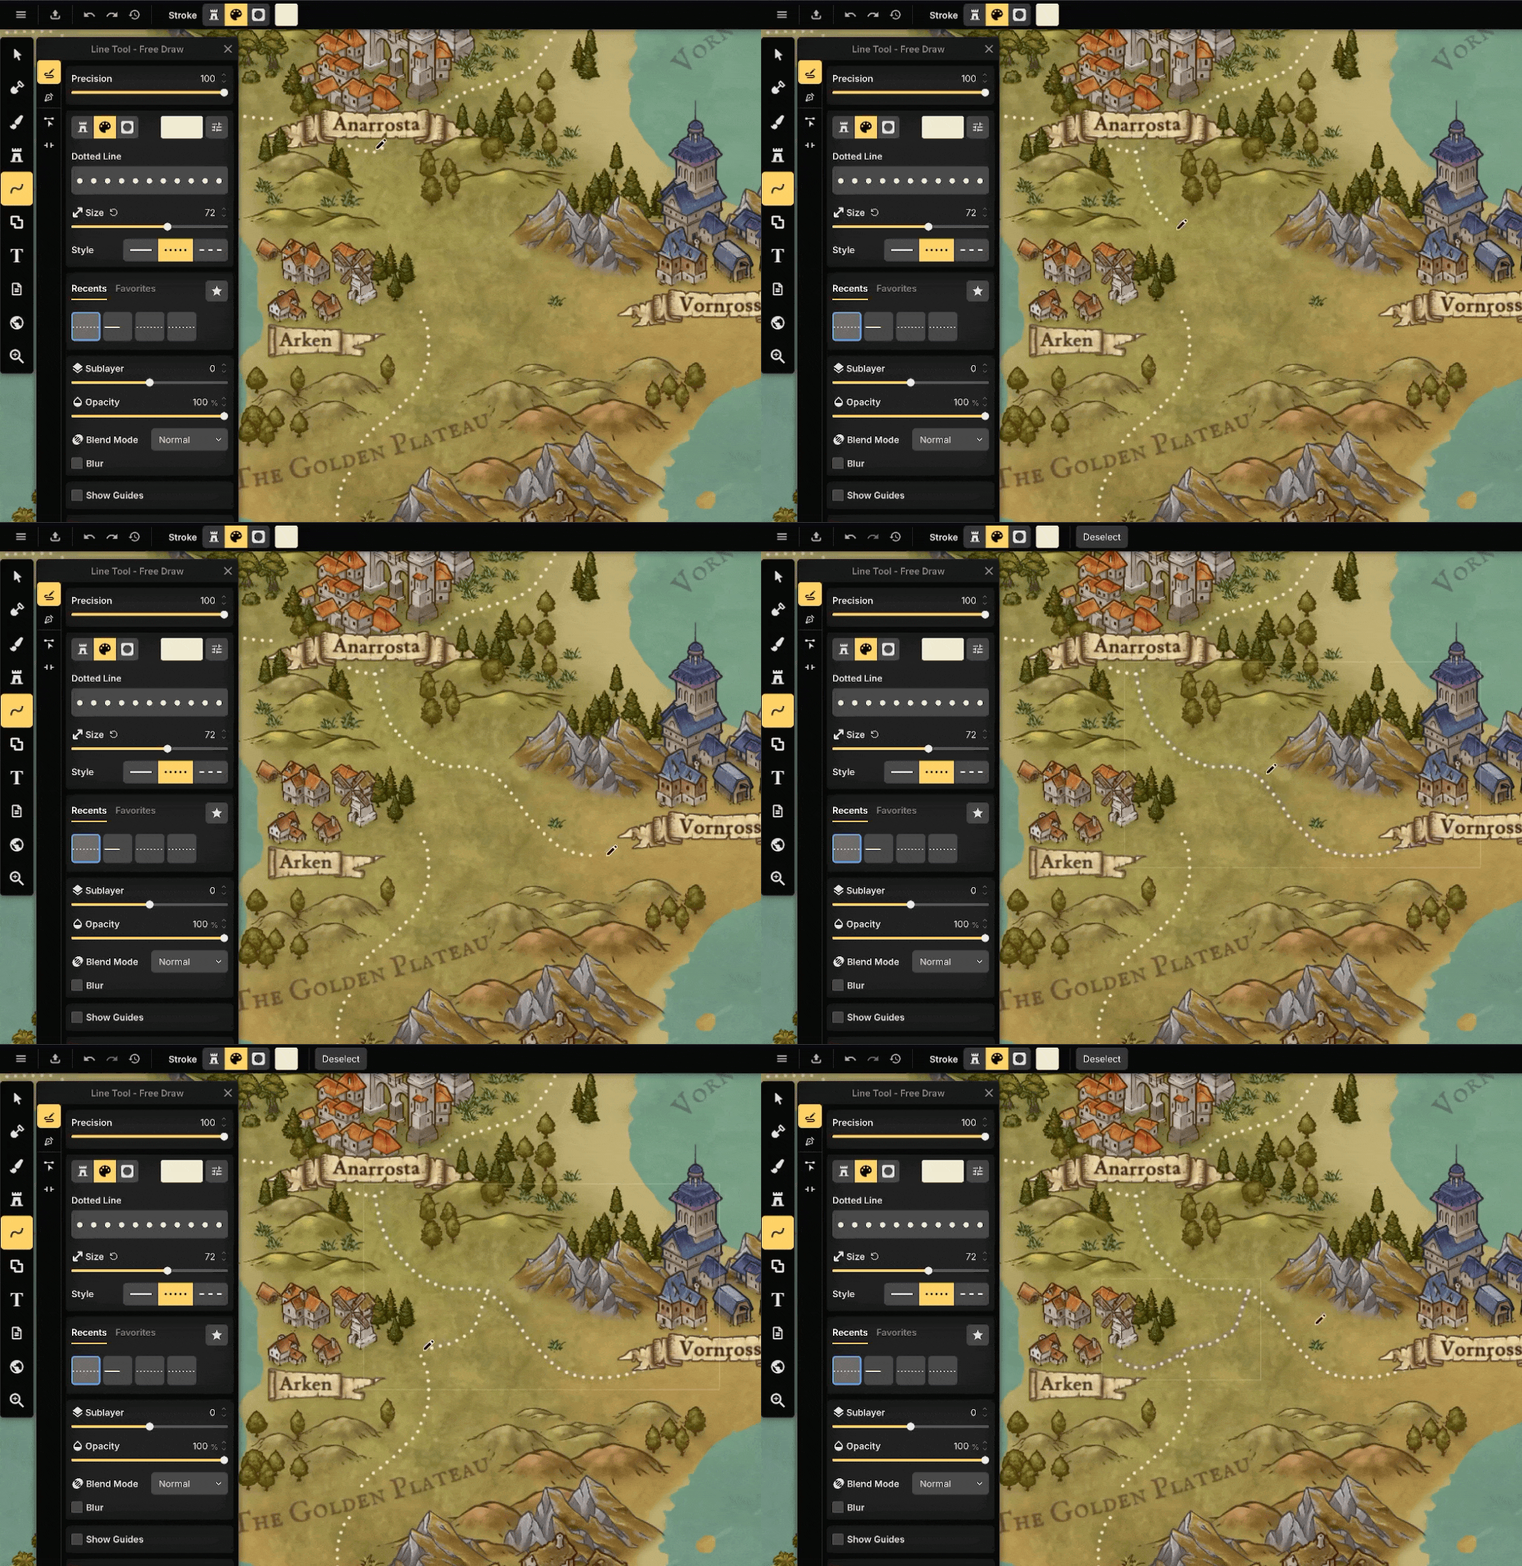
Free Draw
Free Draw lets you create a line or shape by clicking and dragging across the canvas. Nodes are automatically added along the path as you draw.
The Precision slider controls how many nodes are created. Higher precision creates more nodes and captures finer details, while lower precision creates smoother, simpler lines.
Pen
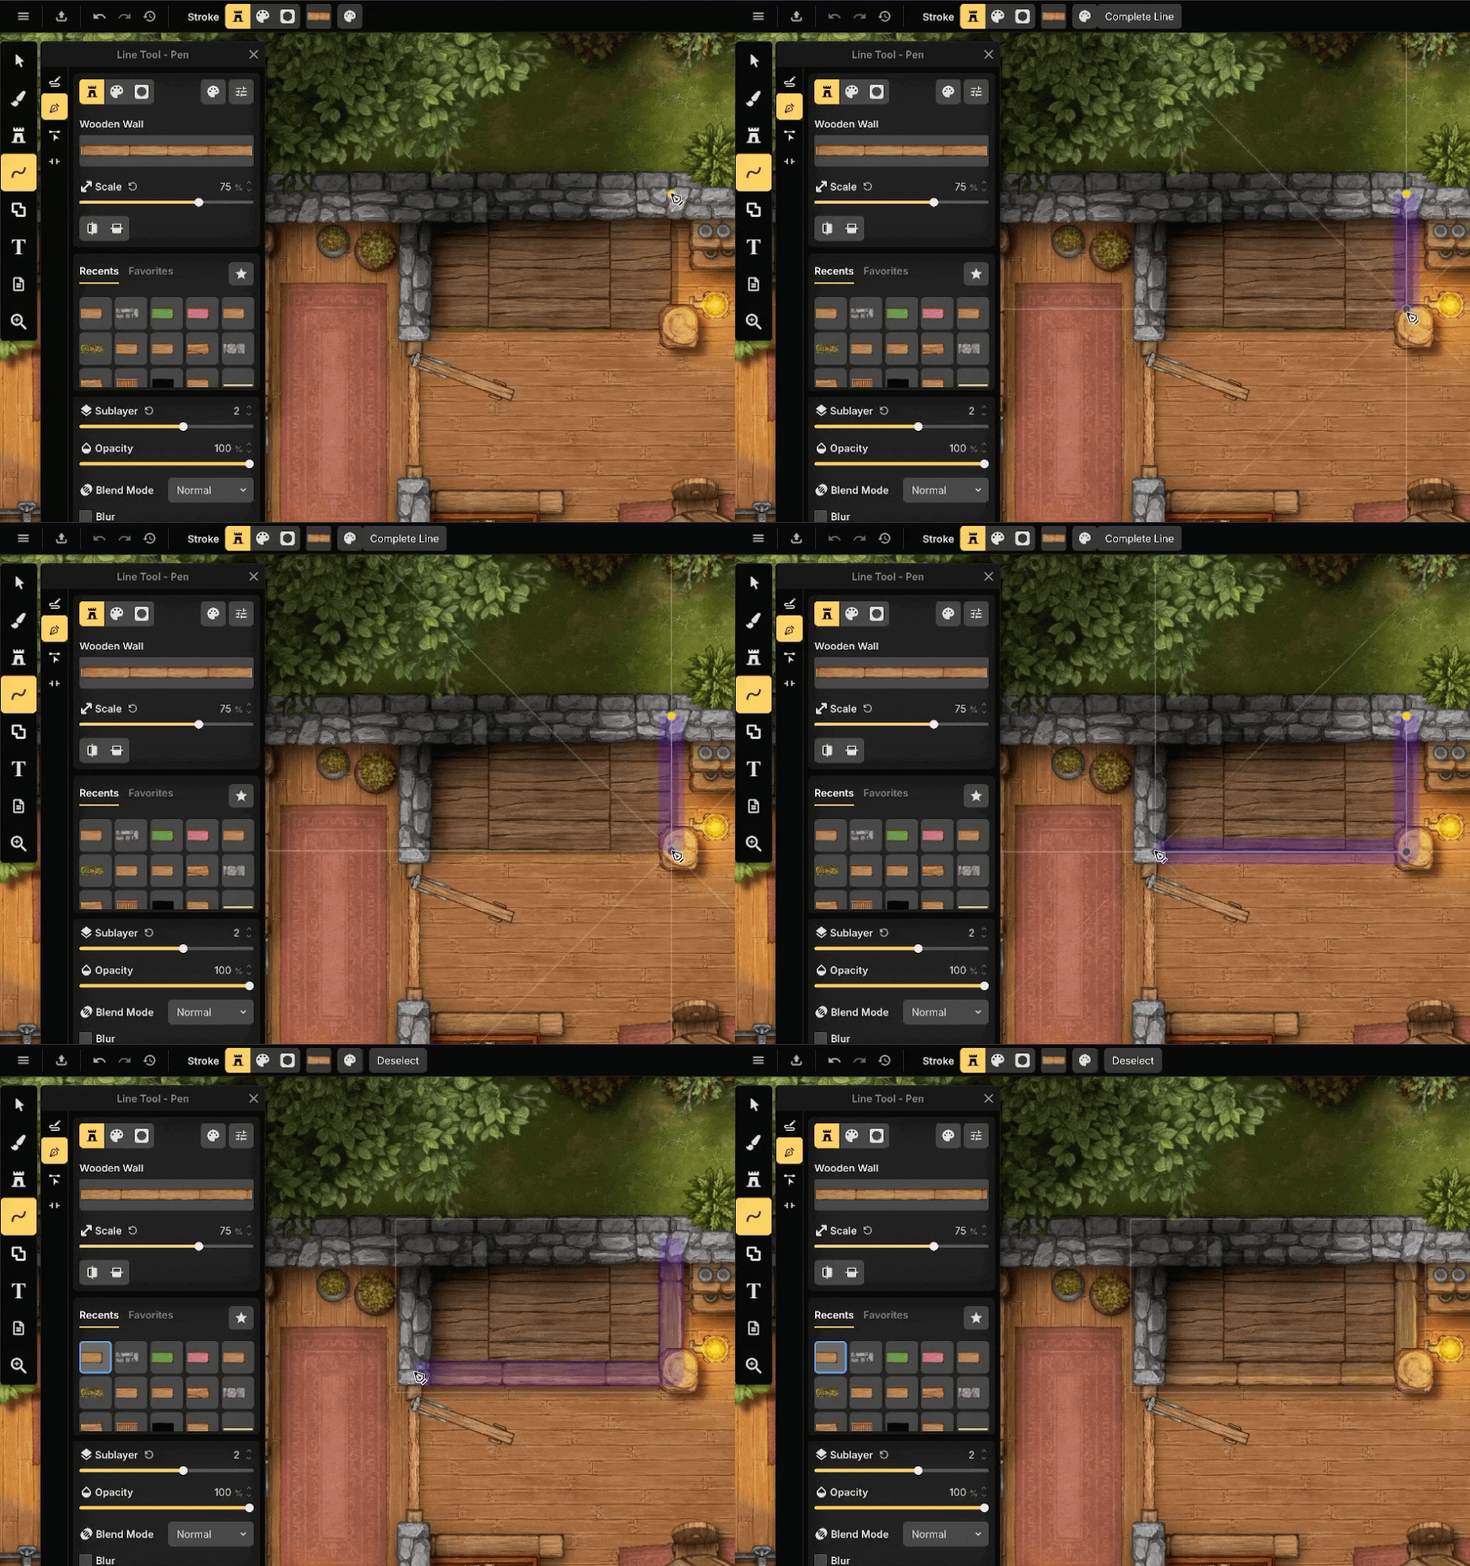
The Pen tool creates lines and shapes by placing individual nodes.
Click to place a straight node.
Click and drag to create a curved node with Bézier handles.
Double-click or press
Enterto finish the current line or shape.Right-click to finish without placing the node previewed under the cursor.
Press
Escto cancel the current creation.Hold
Ctrlto snap the angle between the last placed node and the cursor to 15° increments. Alignment guides are displayed in the eight cardinal and diagonal directions to help position the next node.
Brush
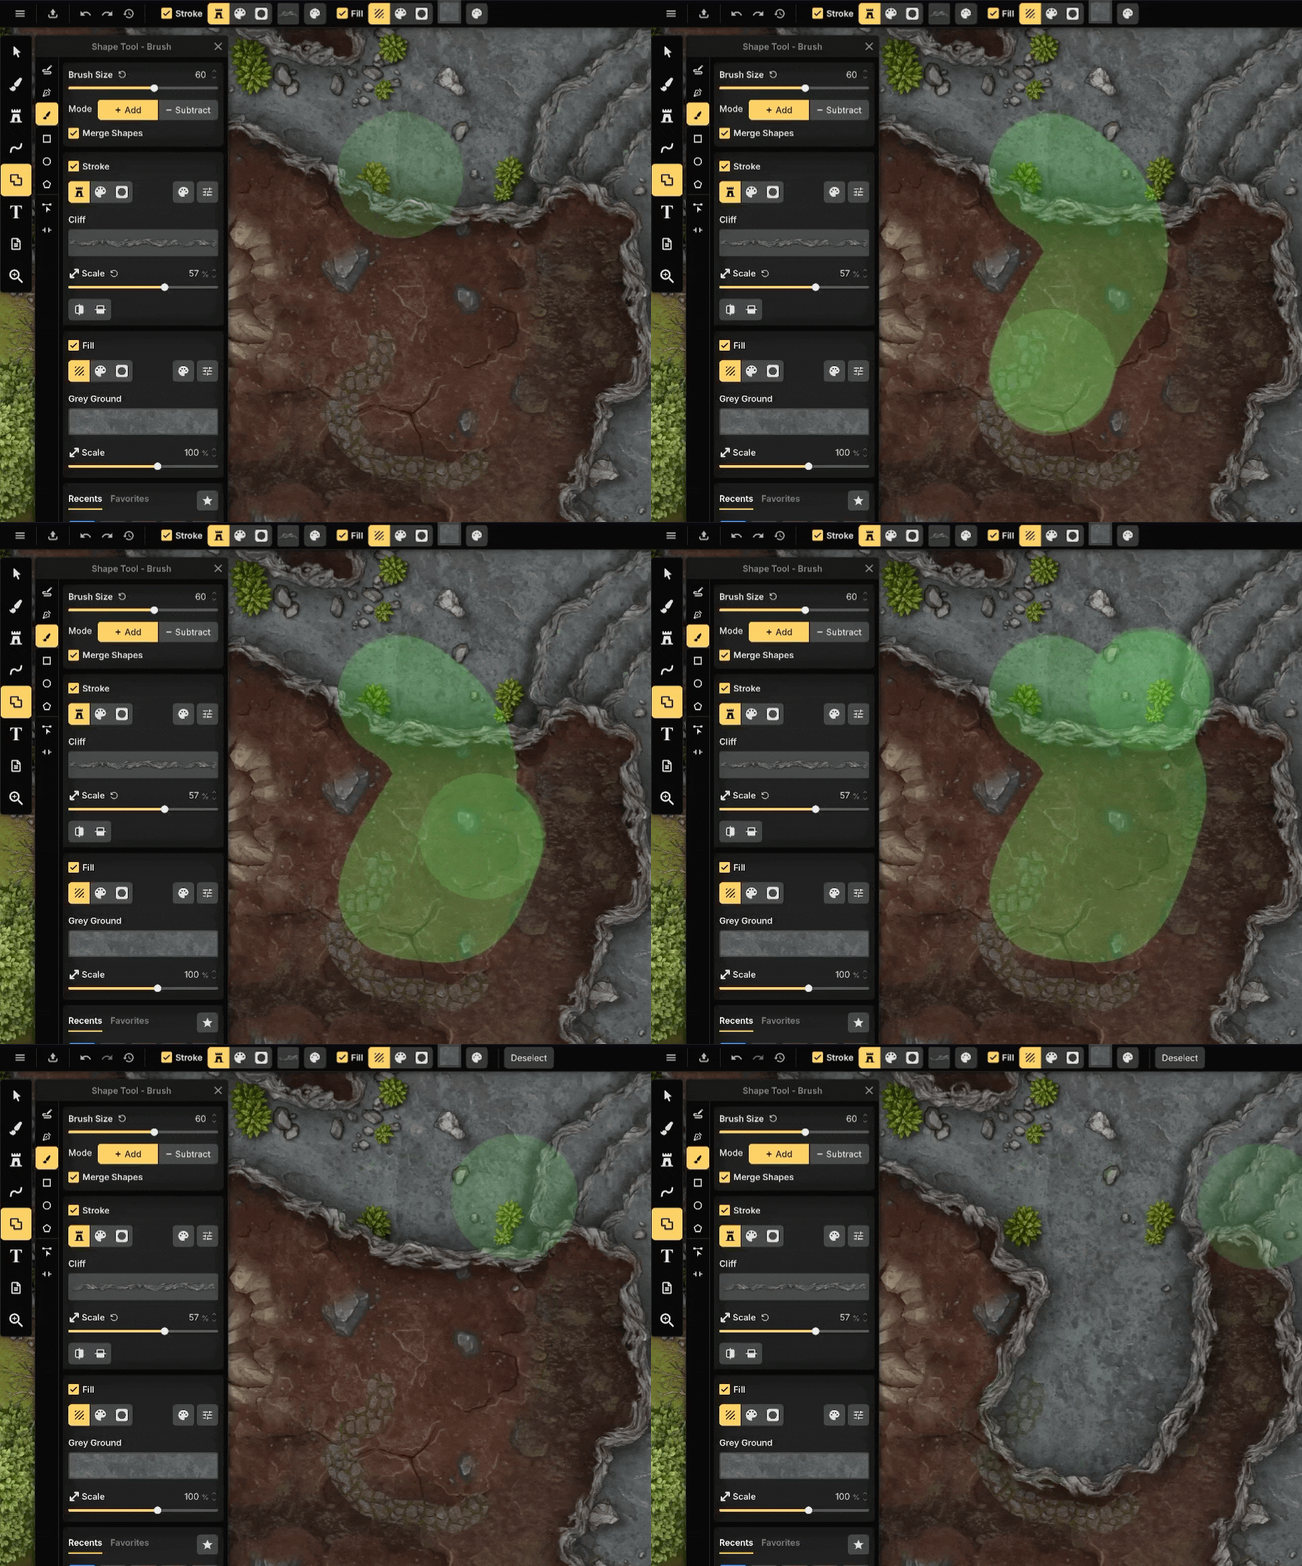
The Brush mode creates a shape by painting directly onto the map. Click and drag to define the shape. The final shape is created when you release the mouse button. Press W/S to adjust the brush size. Hold Shift to adjust it in increments of 10. Alternatively you can hold Shift + Mouse wheel to change the size.
Preset Shapes
Preview Modes let you define an area the shape is applied to. The following types are available:
Rectangle: Create a rectangular area.
Ellipse: Create an elliptical area.
Polygon: Create a regular polygon. The number of sides can be adjusted before applying the texture or color.
While creating or resizing using the Preset Shape mode, you can use modifier keys for more precise control:
Ctrl: Resize from the center instead of the initial corner.Alt: While creating a shape, constrains the selection to a 1:1 aspect ratio, creating perfect squares and circles. While resizing an existing preview, maintains the current aspect ratio.Ctrl + Alt: Combine both behaviors.
When the mode is set to Preview, a preview of the shape is displayed before it is created. The preview can be repositioned and adjusted before applying it. Using the Add or Subtract controls the preview can be applied. The preview remains active, allowing the same shape to be placed multiple times.
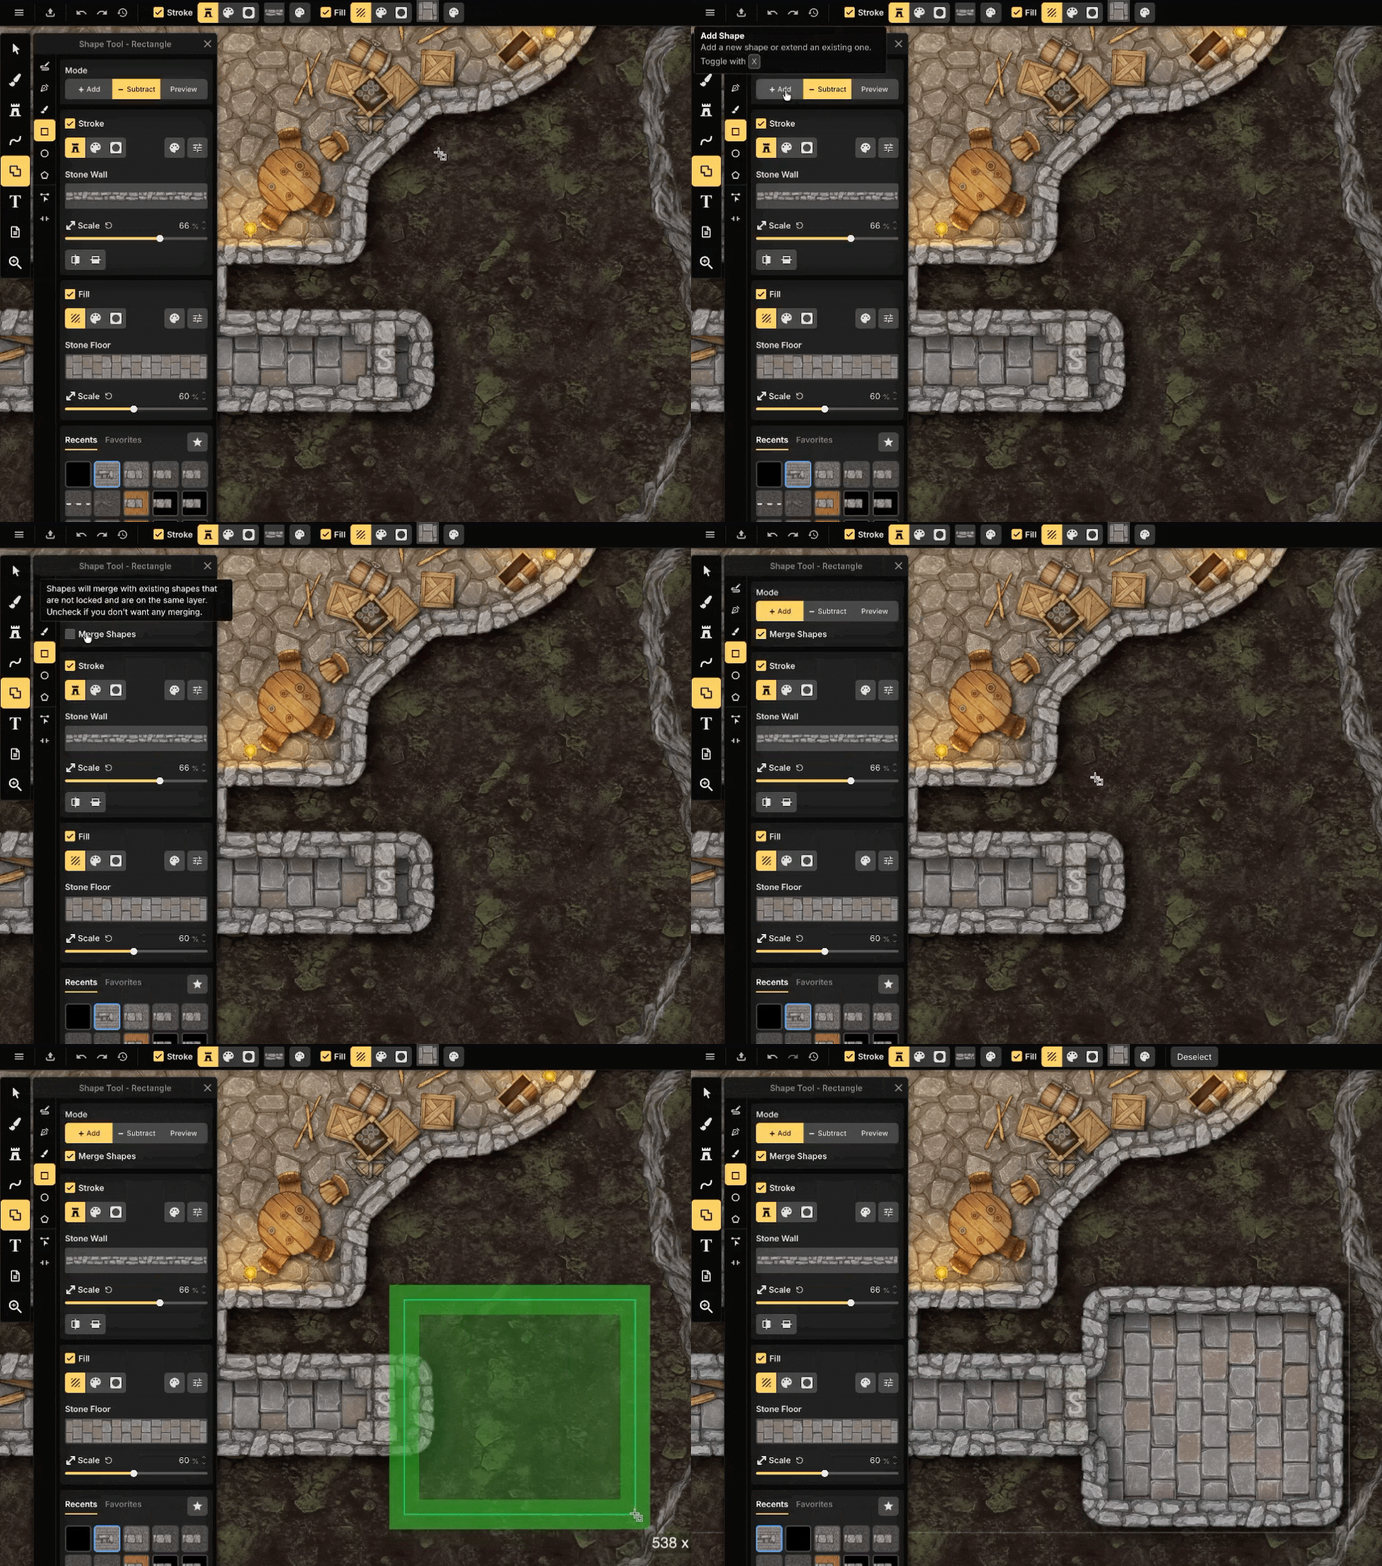
Add & Subtract
Choose whether newly created shapes add to or remove from an existing shape.
Add creates new shape areas.
Subtract removes areas from an existing shape.
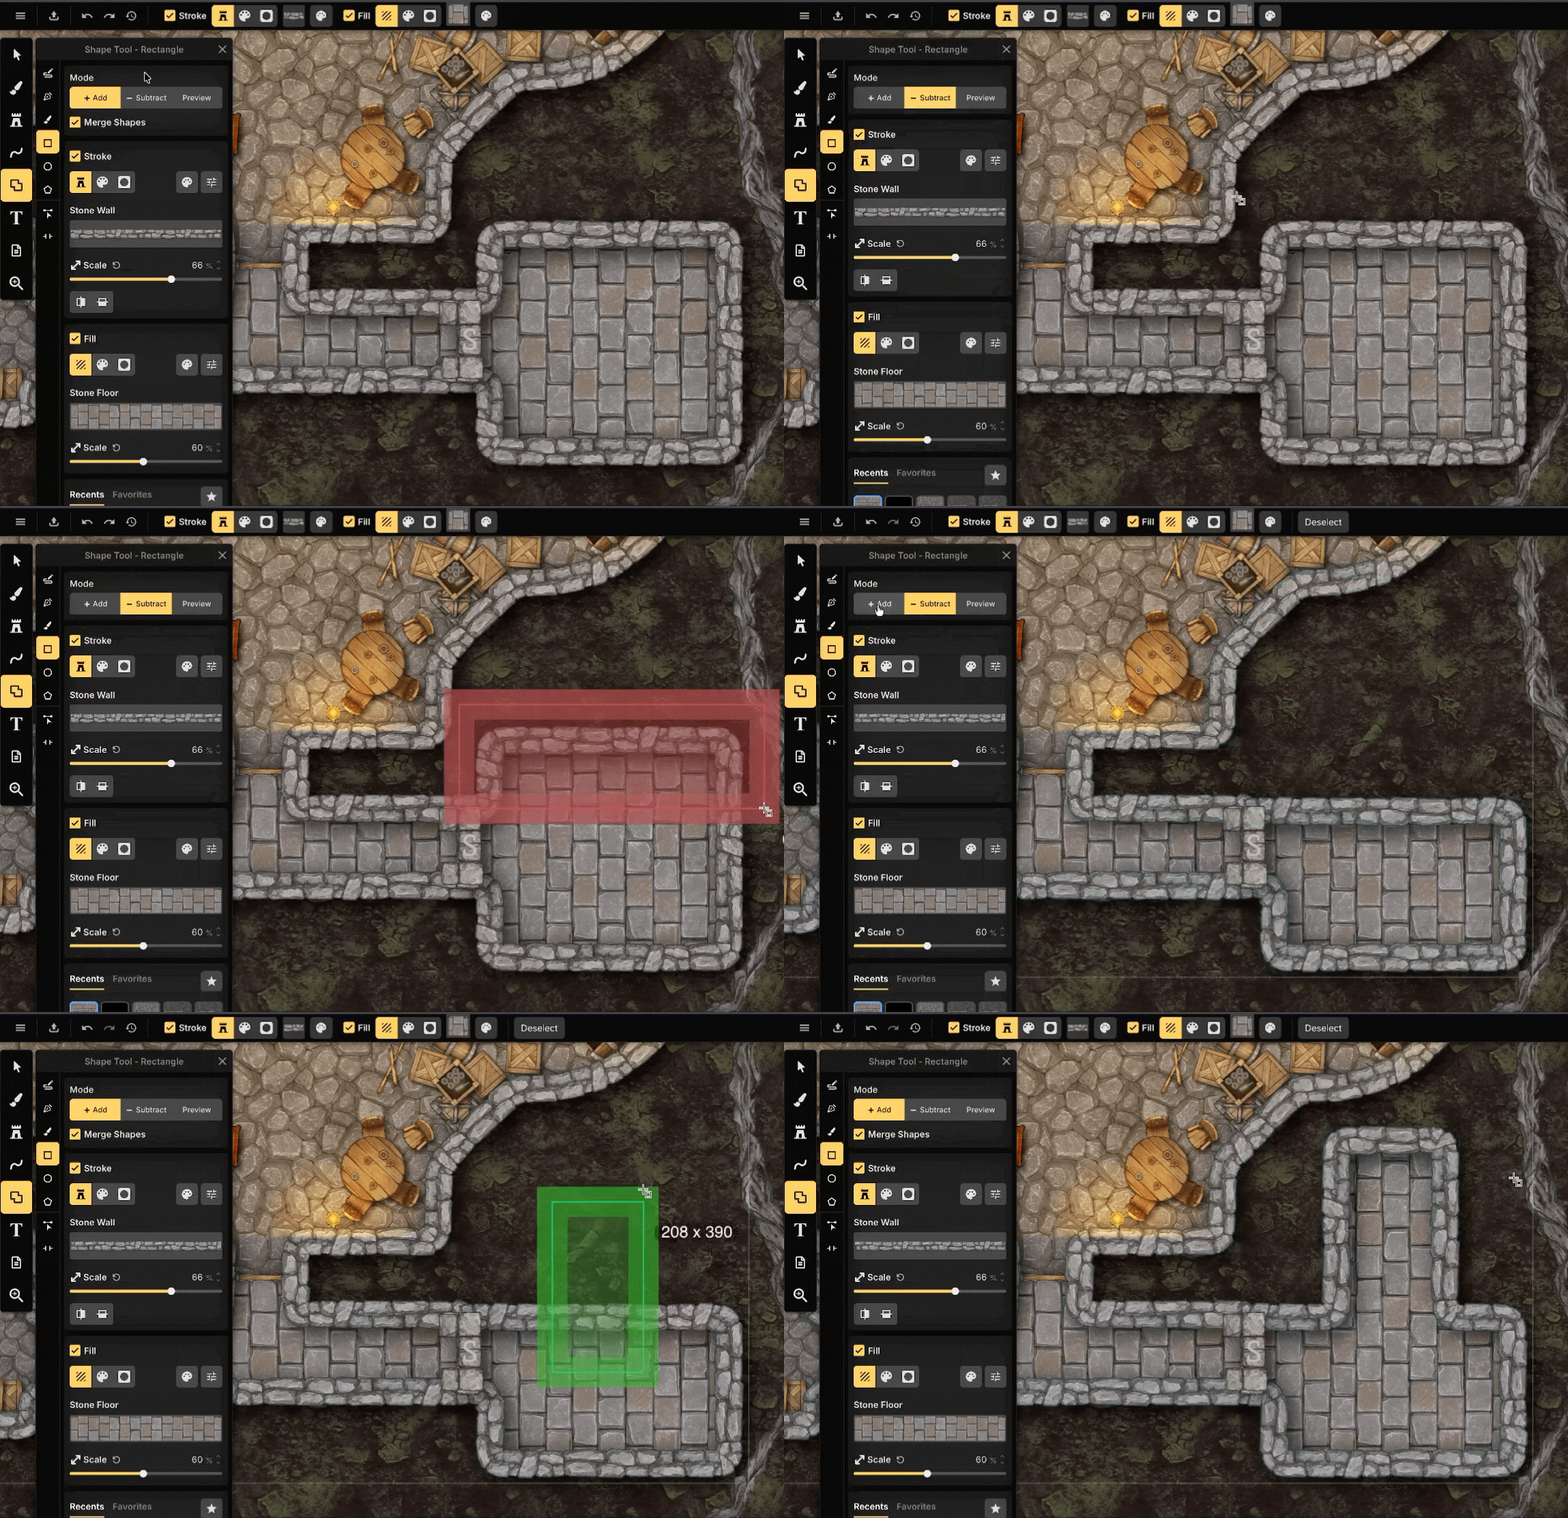
Merge Shapes
Merge Shapes controls whether shapes created in Add mode are merged with existing shapes or created as separate objects.
Both Add and Subtract operations can only interact with existing shapes when all of the following conditions are met:
Both shapes are on the same Object Layer.
Both shapes use the same Sublayer.
The existing shape is not locked.
If any of these conditions are not met, the operation cannot be applied to the existing shape. When shapes are merged, the properties of the newly created shape are applied to the resulting merged shape.
When shapes are merged, the properties of the newly created shape are applied to the resulting merged shape.
Editing
Lines and shapes remain fully editable after they have been created. You can adjust their geometry, split paths, or add editable openings without having to recreate the object.
Editing Nodes
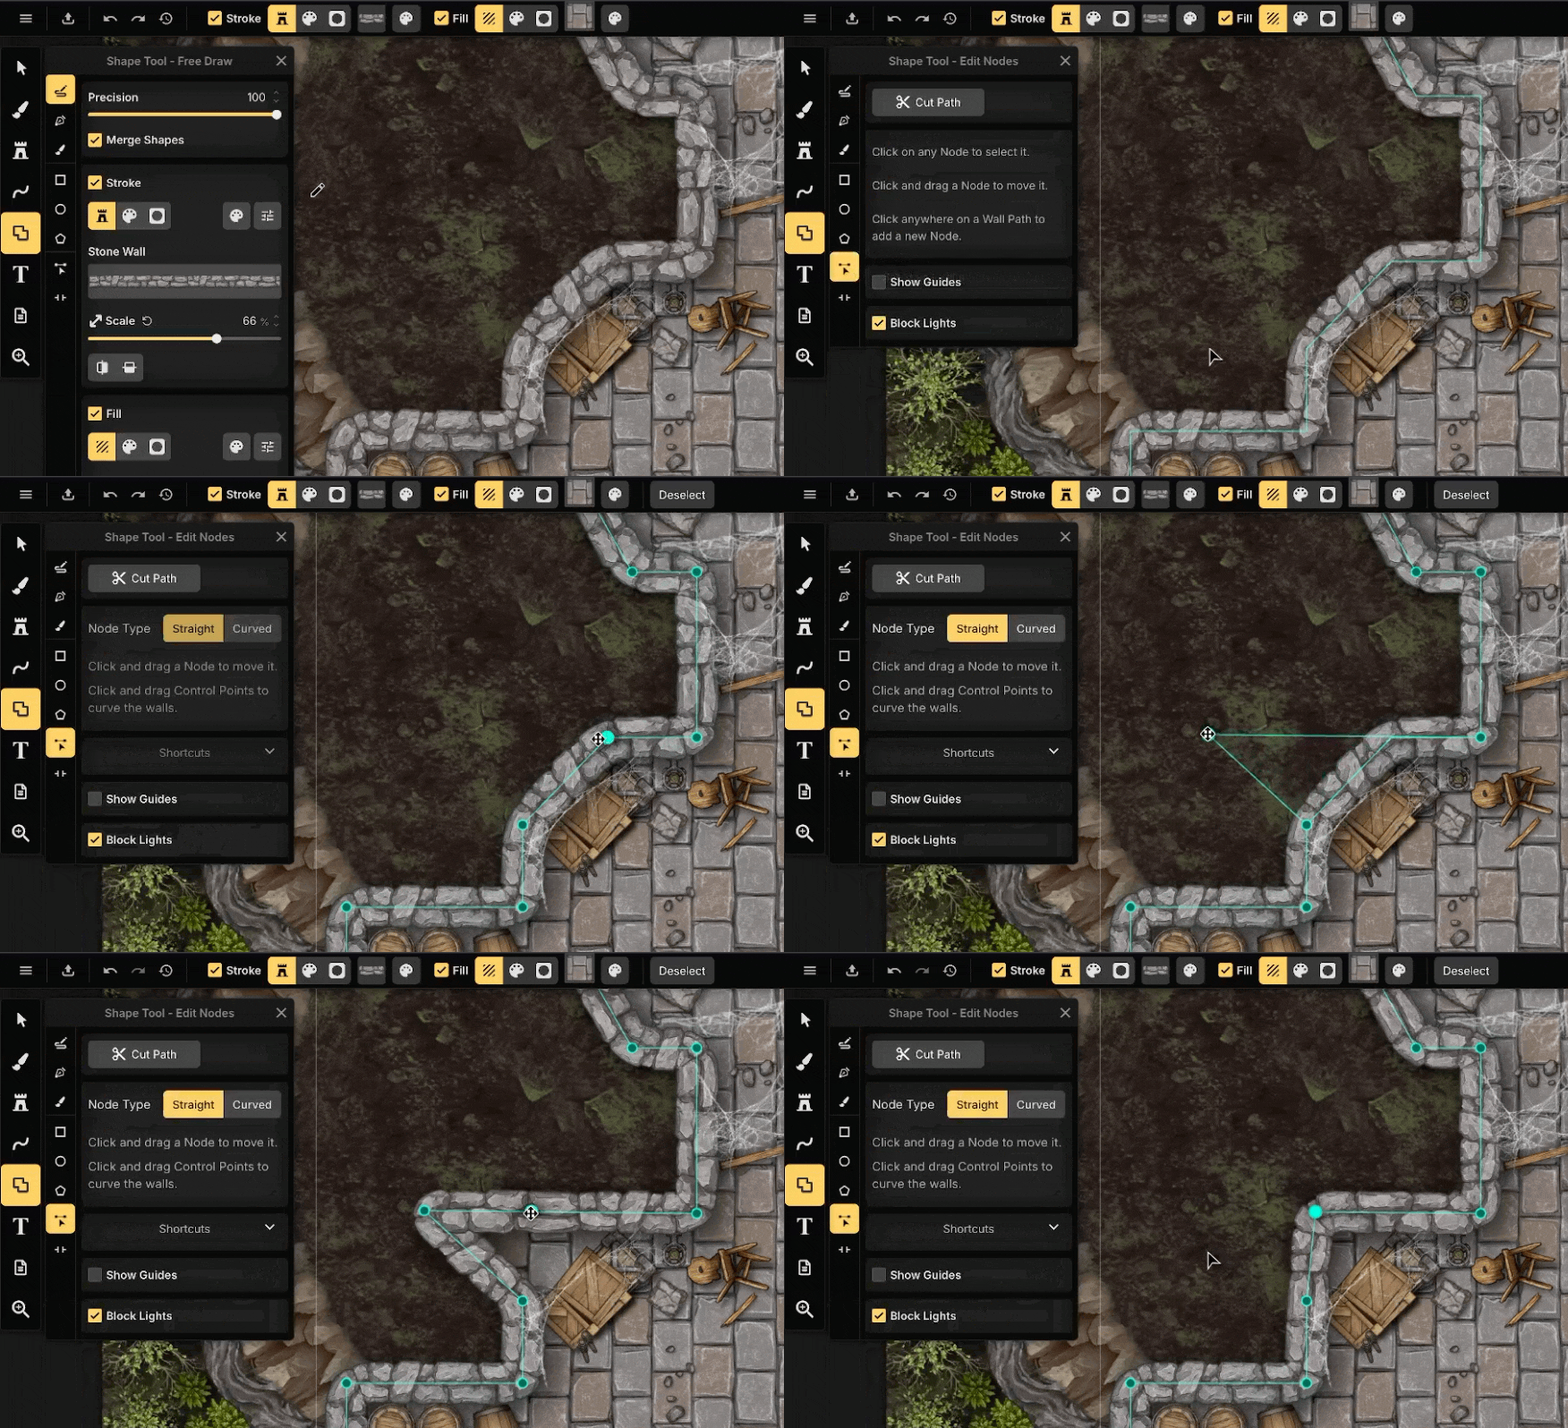
After creating a line or shape, use Edit Nodes to modify its geometry. Select Edit Nodes, then click a line or shape to display its nodes. You can:
Select one or multiple nodes (
Ctrl + Click).Move selected nodes by dragging them or using the arrow keys. Hold
Shiftfor larger increments.Click a line segment to insert a new node.
Press
Deleteto remove selected nodes. If only two nodes remain, deleting one removes the entire object.Press
Cto switch between straight and curved nodes.Hold
Altwhile dragging a curved node’s handle to move each handle independently.
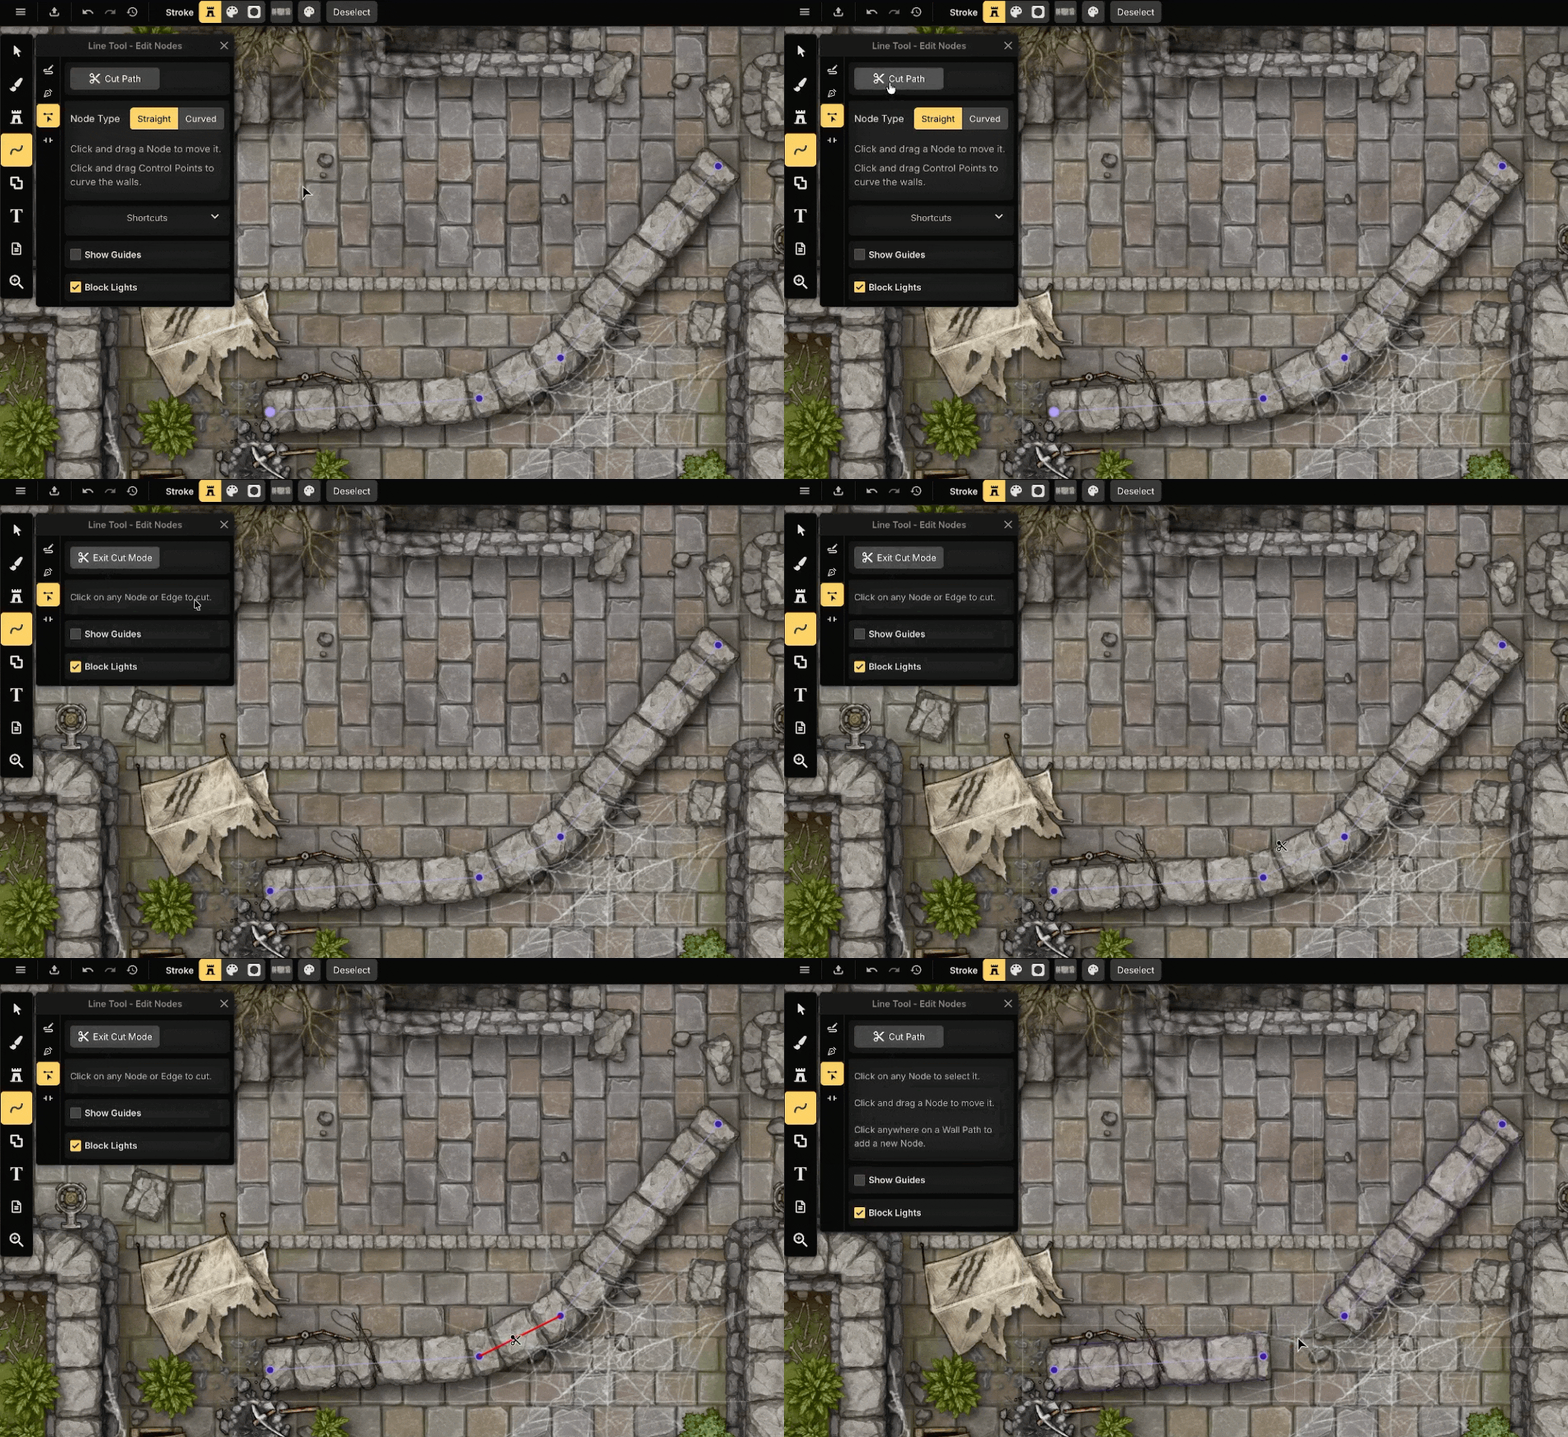
Cut Path
Cut Path splits an existing line or shape into separate objects. When Cut Path is enabled:
Clicking a node splits the line at that node.
Clicking a line segment removes that segment and creates two separate lines.
When cutting a shape, the resulting objects become open lines and the fill is removed.
Portals
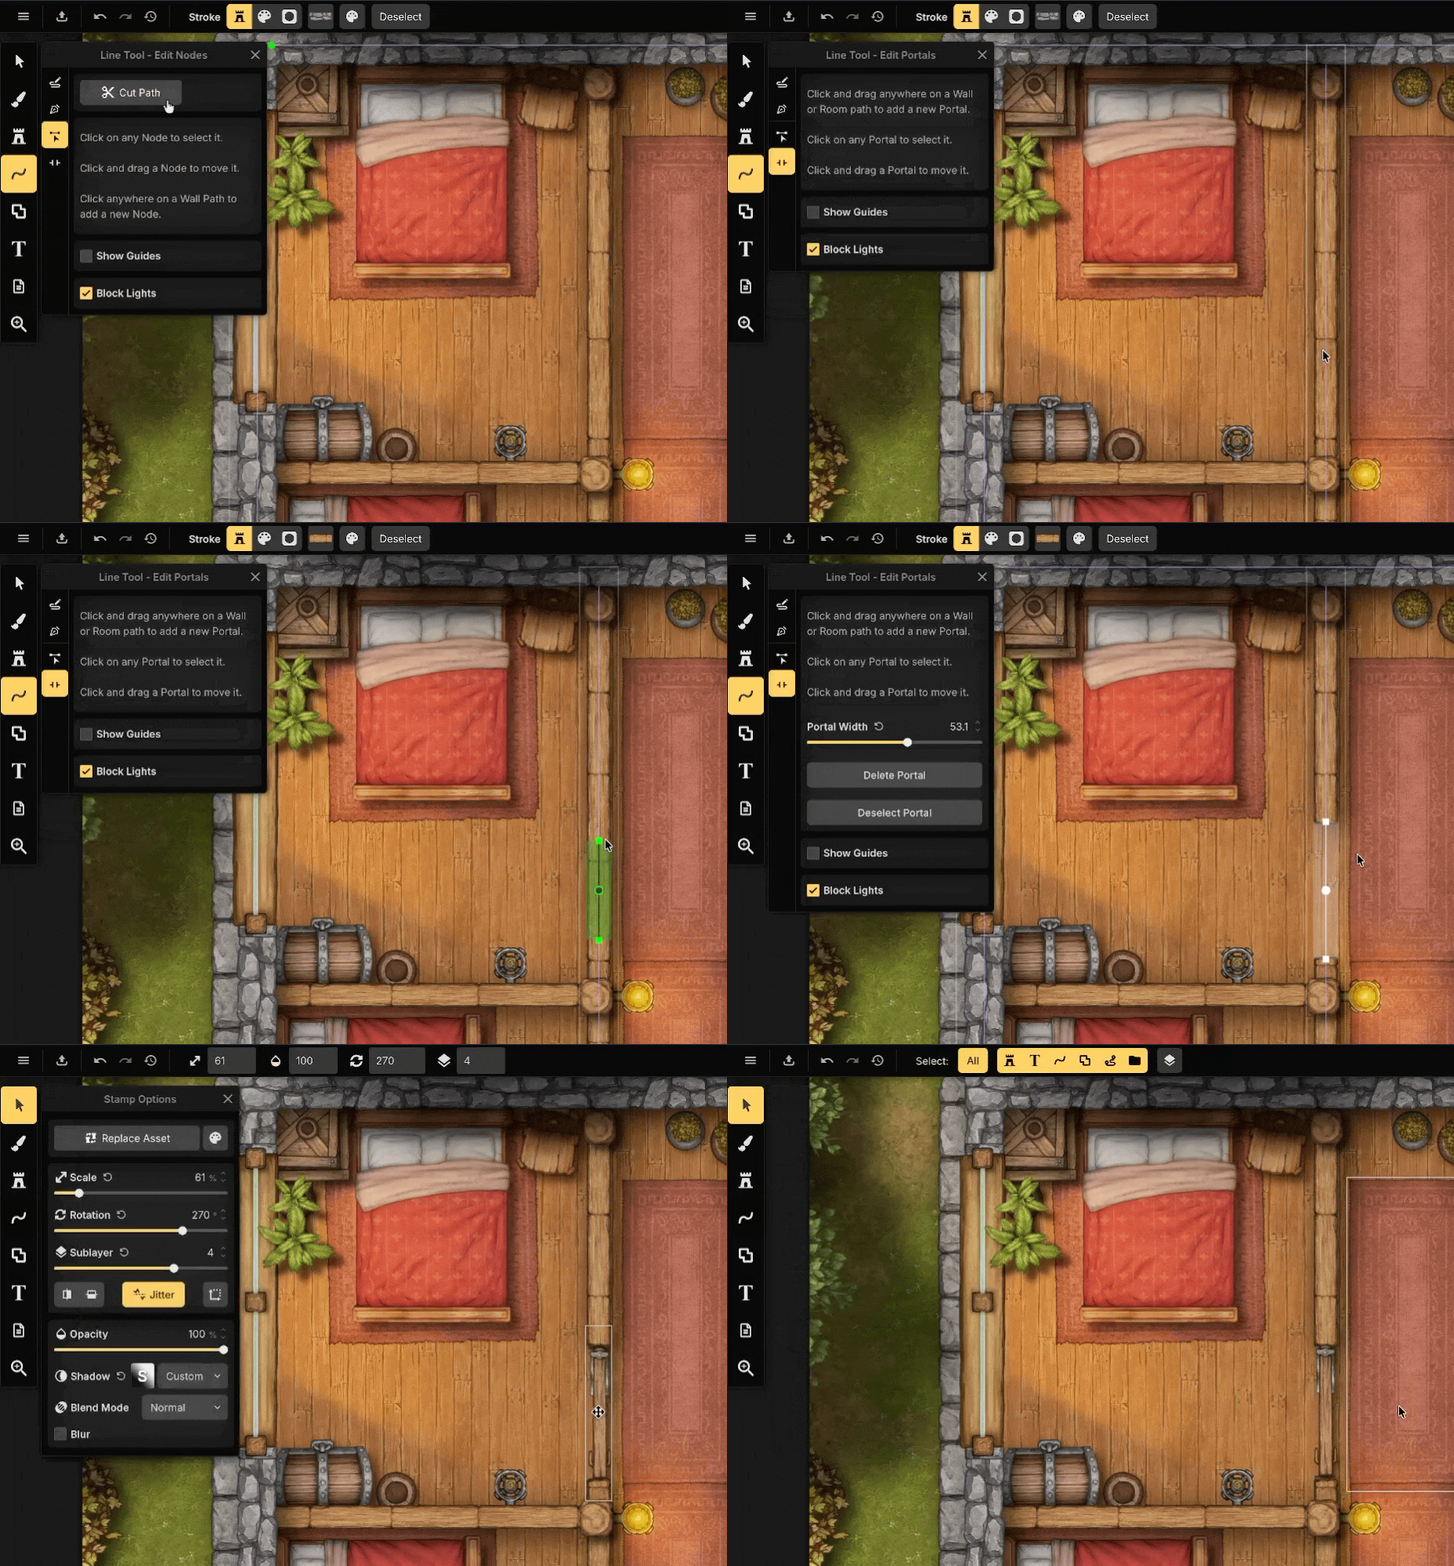
Portals create editable openings in a line or shape without permanently cutting the path.
Click a stroke to place a portal. Its width can be adjusted using the width slider or by dragging its handles directly. Existing portals can be moved, resized, or removed at any time.
Portals are commonly used for doors, windows, gates, and other openings in walls.
Stroke Options
The Stroke defines the outline of a line or shape. Strokes can use stamp assets, solid colors, or clipping behavior, depending on the selected stroke type.
Stroke settings can be adjusted before creating a new object or after selecting an existing line or shape.
Stroke Type
Choose how the stroke is rendered.
Stamp: Renders a repeating stroke asset along the path.
Color: Renders a solid colored outline. The stroke style can be customized, including Solid, Dashed, and Dotted.
Clip: Uses clipping behavior instead of rendering a visible outline. See Clip Masks for more information.
Stamp Stroke
Stamp Strokes use seamless stroke assets that repeat along the length of the path. Click the stroke preview to open the Stroke Catalog and select a different stroke asset. The following settings are available:
Scale: Adjusts the size of the stroke asset. A scale of 100 is intended to match stamps placed at a scale of 100.
Horizontal & Vertical Flip: Flip the stroke asset.
Color Adjustments: Color adjustments modify the appearance of the selected stroke. Available adjustments include: Hue, Saturation, Brightness, Contrast
Advanced Stamp Stroke Options
Offset: Changes where the repeating stroke begins. Optionally randomize the offset for each line or shape.
Caps: Add end caps to the stroke.
End: Adds caps to the start and end of the line, as well as the ends created by portals.
Nodes: Additionally places caps on straight nodes when Round Corners is disabled.
Round Corners: Smooths corners between connected line segments.
Opacity: Adjusts the transparency of the stroke.
Layer Offset: Changes the sublayer on which the stroke is rendered relative to the line or shape.
Shadow: Apply a custom Object Shadow to the stroke. See Shadow Options for more information.
Color Stroke
Color Strokes render the stroke using a solid color, with optional solid, dashed, or dotted styles. Click the color preview to open the Color Picker. See Color Picker for more information. The following stroke settings are available for color strokes:
Size: Controls the thickness of the stroke.
Style: Choose between Solid, Dashed, and Dotted strokes.
Advanced Color Stroke Options
Gap Length: Controls the spacing between dashes or dots.
Dash Length: Controls the length of each dash when using the Dashed style.
Line Caps: Choose between Square and Round line ends.
Opacity: Adjusts the transparency of the stroke.
Layer Offset: Changes the sublayer on which the stroke is rendered relative to the line or shape.
Shadow: Apply a custom Object Shadow to the stroke. See Shadow Options for more information.
Clip Stroke
Clip Strokes use the same clipping behavior as Clip Masks, allowing the stroke to blend with the underlying terrain instead of rendering a visible outline. The following settings are available:
Size: Controls the thickness of the stroke. It’s rendered the same as a solid colored line.
Fill Options
The Fill defines how the inside of a shape is rendered. Fills can use textures, solid colors, or clipping behavior, depending on the selected fill type.
Fill settings can be adjusted before creating a new shape or after selecting an existing shape. Fill Options are only available for the Shape Tool.
Fill Type
Choose how the fill is rendered.
Texture: Fills the shape using a texture from the Brush Catalog.
Color: Fills the shape with a solid color.
Clip: Uses clipping behavior instead of rendering a visible fill. See Clip Masks for more information.
Texture Fill
Texture Fills use the same textures available in the Brush Tool. Click the texture preview to open the Brush Catalog and select a different texture. The following settings are available:
Scale: Adjusts the size of the texture. A scale of 100 is intended to match stamps placed at a scale of 100.
Color Adjustments: Color adjustments modify the appearance of the selected texture. Available adjustments include: Hue, Saturation, Brightness, Contrast
Advanced Texture Fill Options
Rotation: Rotates the texture.
Horizontal & Vertical Offset: Changes the position of the texture within the shape.
Opacity: Adjusts the transparency of the fill.
Layer Offset: Changes the sublayer on which the fill is rendered relative to the shape.
Round Corners: Smoothes the corners of the fill where applicable.
Color Fill
Color Fills render a solid color inside the shape. Click the color preview to open the Color Picker. See Color Picker for more information.
Advanced Color Fill Options
Opacity: Adjusts the transparency of the fill.
Layer Offset: Changes the sublayer on which the fill is rendered relative to the shape.
Round Corners: Smooths the corners of the fill where applicable.
Clip Fill
Clip Fills use the same clipping behavior as Clip Masks, allowing the fill to blend with the underlying terrain instead of rendering a visible fill.
Advanced Clip Fill Options
Opacity: Adjusts the transparency of the fill.
Layer Offset: Changes the sublayer on which the fill is rendered relative to the shape.
Round Corners: Smooths the corners of the fill where applicable.
Recently Used
The Recently Used section displays the most recently used stroke and fill combinations, including all associated settings. Selecting an entry restores both the stroke and fill configuration, making it easy to reuse previously created styles.
When using the Line Tool, only the stroke settings are applied, as lines do not support fills.
Favorites
Save commonly used stroke and fill combinations as Favorites to reuse them across different maps.
Favorites store the complete stroke and fill configuration, including all associated settings. When using the Line Tool, only the stroke portion of a favorite is applied.
Placement Properties
Placement Properties control the position, size, orientation, and drawing order of the selected line or shape. Sublayer is available while creating or editing an object. Size, Rotation, and Horizontal & Vertical Flip are available after selecting an existing object with the Select Tool.
Size: Scales the entire object, including its stroke and fill. Changing the object size also updates the Stroke Scale and Fill Scale, so those values continue to match stamps and textures using the same scale value.
Rotation: Rotates the selected object.
Sublayer: Controls the display order within the active Object Layer.
Horizontal & Vertical Flip: Flips the selected object along the horizontal or vertical axis.
Appearance Properties
Appearance Properties control how the selected line or shape is rendered without changing its geometry. The following properties are available:
Opacity: Adjusts the transparency of the entire object.
Blend Mode: Controls how the object blends with the colors and textures beneath it. See Blend modes for more information
Blur: Applies a blur effect to soften the appearance of the object.
Paid Feature
The Blur property is available with a paid subscription.
Tips
Enable Merge Shapes to quickly expand buildings or dungeon rooms.
Use Portals instead of cutting lines when creating doors, as they remain fully editable.
Enable Show Guides to display the underlying guide path when the object is hovered, making it easier to select and edit.
Use the Line tool to create objects with dynamic length such as tables or bookshelves
Many new wall assets have corner pieces stored within the same asset pack. You can use them to customize your rooms further, giving them neater, sharper corners.
Use the Ellipse Preset Shape together with Alt to create perfect circles.
See Also
Catalog: Browse and select assets of different types.
Stamp Tool: Place and customize assets on your map.
Clip Masks: Learn how clip strokes and clip fills blend with the underlying terrain.
Object Panel: Select, organize, and manage line, shape, and stamp objects on the active Object Layer.
Layers Panel: Create and manage Object Layers, control drawing order, and organize map content.
Was this helpful?
Still need help? Ask the team